|
<< Click to Display Table of Contents >> Deck cargo |


|
|
<< Click to Display Table of Contents >> Deck cargo |
|
The general buttons are already explained in the edit lines topic.
In the ribbon on the cargo tab a button is available called Reserved areas:

You can use the reserved areas functionality when you would like to add cargo items to a specific area. When you click on reserved areas the following screen will pop-up:
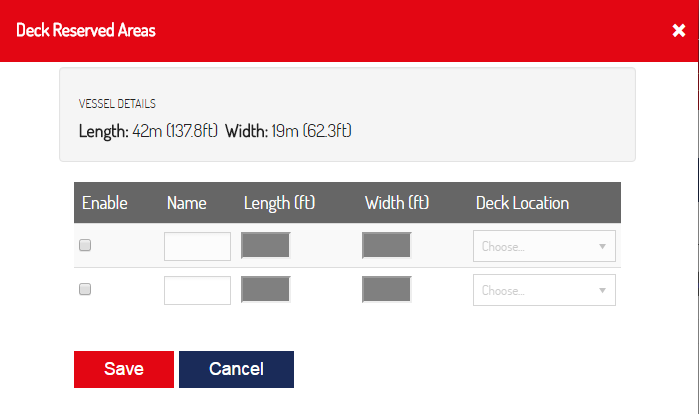
Up to two reserved areas can be created by checking the box beneath Enable. In the Name field you can choose either one of the default names (Zone 1 and Zone 2) or provide a name of your own. Both length and width are mandatory and you can optionally provide the location on the deck where you want the zone to be located. This information will be available for the foreman when loading the vessel. After pressing Save the reserved area is taken into account when calculating the deck utilisation and becomes available on cargo item level to assigning cargo to the reserved area.
After enabling a reserved area the name of the area becomes available in the deck location dropdown list in the edit grid. When you assign a cargo item to a reserved area, the footprint of the cargo item itself is excluded from the deck utilisation calculation.
All the information about the cargo items which have to be shipped to or from the offshore installation can be added into the grid of the edit lines screen. Within some of the columns extra functionality exists to support the user or the process.
•X indicates that the column is applicable;
•0 indicates that the column is not applicable.
Column |
Description |
Outbound |
Inbound |
Aberdeen |
Great Yarmouth |
Den Helder |
Contents |
Possibility to enter the content of the material. You are able to enter the content by double clicking on the line or by clicking on the |
X |
X |
X |
X |
X |
RT / ROB |
When opening the RT / ROB column you are able to select: •Boatskip, will indicate that the cargo item is a boatskip; •ROB, will indicate that the cargo item will remain on board; •RT, will indicate that the cargo item is marked as a round trip. |
X |
X |
X |
X |
X |
Deck Loc |
Via this column you can indicate where on the deck of the vessel the cargo item should be loaded. When you have added a reserved area, the reserved area will also be selectable via this column. |
X |
X |
X |
X |
X |
UnitType |
Via this column you can indicate the unit type of the cargo item. The system uses the Unit Type to calculate the deck percentage. |
X |
X |
X |
X |
0 |
Collect Date |
Possibility to enter the collection date of the cargo item |
X |
0 |
X |
X |
0 |
Collect Time |
Possibility to enter the collection time of the cargo item. |
X |
0 |
X |
X |
0 |
Transport Req. |
Possibility to enter the transport requirement of the cargo item. For Aberdeen and Great Yarmouth it is possible to select the following options: Collection, to indicate that the cargo item should be collected by Peterson. Vendor delivery, to indicate that the cargo item will be delivered by the vendor. For Den Helder it is possible to select: Paleiskade Transfer Interbase Other interbase Vendor |
X |
0 |
X |
X |
X |
Address |
Possibility to enter the address of the pick-up location. |
X |
0 |
X |
X |
0 |
Name |
Possibility to enter the name of the contact. |
X |
0 |
X |
X |
0 |
Phone |
Possibility to enter the phone number of the contact. |
X |
0 |
X |
X |
0 |
Explosives |
As explosive is related to DG / UN number this attribute could be removed. |
X |
0 |
X |
X |
0 |
AMLA |
To be used to indicate the AMLA Client if applicable. Normally the locations used will all be linked to the client who hired the vessel. However, with AMLA sharing it is possible to put cargo for another destination on the voyage. |
X |
X |
X |
0 |
0 |
See also